You may already be familiar with Twilio - the cloud service that allows app developers to make and receive phone calls and text messages through its web service APIs. Simple use cases include automated authentication requests and service alerts, though Twilio's flexibility enables far more complex applications.
What you may not be aware of, is that Twilio and OnSIP resources can work together to introduce well-polished cloud phone system features to a Twilio phone application with hardly programming at all. This is possible through our Inbound Bridge feature, which incorporates third party phone numbers (including international numbers) as if they were first party extensions.
Within a few minutes of signing up for a Twilio account, I was able to forward calls from the phone number they provided to an OnSIP auto attendant or Enhanced Queue. Below, I'll show you how.
1. Sign up for OnSIP and Twilio accounts
Developers will appreciate the efforts of both platforms to streamline the signup process. You'll be able to get through these steps without needing to provide a credit card or talk to a sales representative.

To begin with OnSIP, complete the short form on onsip.com/signup. You can even sign up with your Google or Slack credentials to complete this process more quickly. Once your account is activated, you'll have the necessary credentials to access the OnSIP Admin Portal.
Twilio has a similarly short signup process, located at twilio.com/try-twilio. They'll ask you to provide a phone number to verify your account. Upon verification, you'll be offered a virtual tour of the dashboard, which you can decline if you wish to continue with this guide.
2 .Create an Inbound Bridge with OnSIP
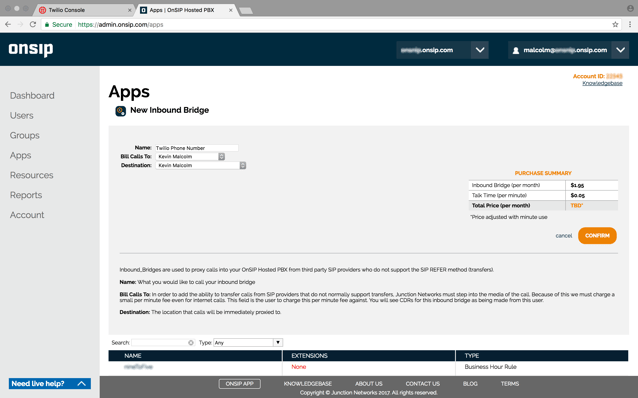
From OnSIP's Admin Portal, click "Apps" on the lefthand menu, then "Create New Apps" and select "Inbound Bridge" to begin creating your Inbound Bridge. This will present you with a description of the app, as well as pricing information. (Note: All features are free for your first 30 days and no credit card is required to get started.)

Create the Inbound Bridge and give it a name that you can easily remember. The "Destination" field is where we'll be sending incoming calls. We'll come back to this later.
When the details of the Inbound Bridge are confirmed, you'll be presented with the SIP Address associated with it. We'll be using this address in the next step.

3. Obtain a phone number from Twilio
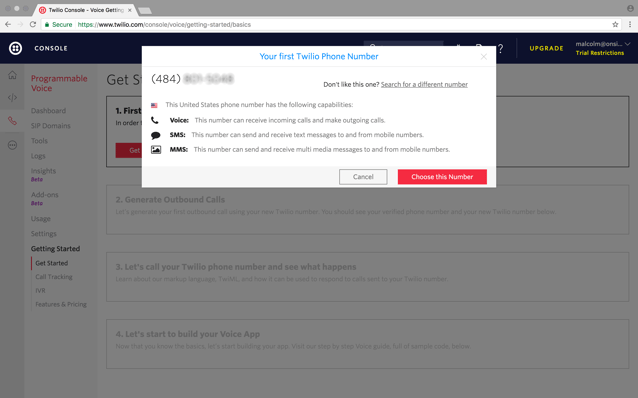
From the Twilio Console's home page, you can click "Programmable Voice" under "All Twilio Products", then "Get Started" in order to receive your phone number. This link should direct you to the same place.

4. Forward calls to your OnSIP Inbound Bridge
Once you've chosen your phone number, you can exit the tutorial and head to the Developer Center. There, you should find a link titled "TwiML Bins", which will lead you here. We'll be creating a new bin with some sample code to direct the calls to your OnSIP Inbound Bridge.
<?xml version="1.0" encoding="UTF-8"?>
<Response>
  <Dial>
    <Sip>
      sip:inboundBridgeName@example.onsip.com
    </Sip>
  </Dial>
</Response>
The <Dial> code allows you to route calls calls being sent to your Twilio number elsewhere. In this instance, we're sending them to the SIP address of your Inbound Bridge from step 2.
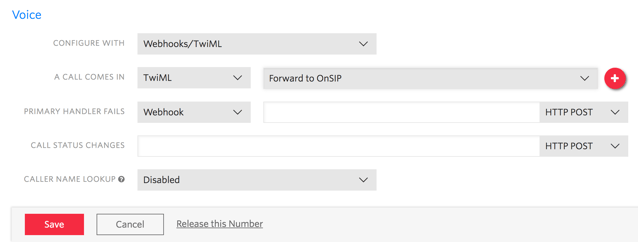
To implement this bin, go back to the Twilio Console home screen and click on "Phone Numbers" - or follow this link. Click on a phone number and select the TwiML Bin you just created from the dropdown.
 Once you click "Save", any calls made to your Twilio phone number will be routed to the "Destination" of your OnSIP Inbound Bridge.
4. Customize your Twilio Phone Application
Now that you have the basics set up, you can go about implementing custom calling features for your Twilio phone number. The two places to do this are the TwiML Bin and the destination of the Inbound Bridge.
In the TwiML Bin, you can execute TwiML code before the dial section to provide context for your callers. For example, executing the following code will result in an automated voice saying "Hello world" before sending the call to your Inbound Bridge.
<?xml version="1.0" encoding="UTF-8"?>
<Response>
  <Say>Hello world</Say>
  <Dial>
    <Sip>
      sip:inboundBridgeName@example.onsip.com
    </Sip>
  </Dial>
</Response>
Twilio supplies documentation for how to further customize this portion.
As for the destination of the Inbound Bridge, a dropdown menu allows you to choose from any of the Apps you've created in the OnSIP Admin Portal. This includes voicemail boxes, auto attendants, queues, groups and more.

Custom Calling Features with Twilio and OnSIP
By connecting a Twilio phone number with OnSIP's Inbound Bridge feature, you can access all the advanced calling features available with cloud phone systems. This enables you to create custom phone applications to support your business.
For example, you can create an auto attendant and have callers use their dialpad to select specific options or access a Dial-by-Name Directory. Or, direct calls to an ACD queue that follows preset Business Hour Rules and plays Music on Hold. You can even send incoming calls to a ring group that follows a hunt group strategy, then fails over to a personal voicemail box. It's all up to you.
For more ideas on how to design your business call flow, check out our previous blog on Hosted PBX Setup: Design a Phone Tree—it comes with a free downloadable template.


