

Door buzzers or intercoms (and their associated locking mechanisms) are widely used to remotely grant access to secure locations. Whether it's at the entrance of an apartment building, in a warehouse, or in an office, chances are you've already used one.
You may want to set up a door-unlocking system for your own company but aren't completely sure how it is configured or how it operates on the other side. Well, the good news for OnSIP users is that configured SIP intercoms and buzzers are as simple to connect to your network as a typical SIP phone.
SIP-enabled Door Buzzers and Intercoms
Just like phones, there are a number of manufacturers for SIP intercoms. When we first brought in a few devices to test with our service back in 2012, we found that CyberData devices were compatible and easy enough to set up with OnSIP; we felt comfortable recommending them to our customers. Four years later, we still stand by Cyberdata, as well as a couple others: Algo and Valcom.
Instructions for how to install the hardware will be available through the manufacturer's documentation. For example, here is the Installation and User Guide for the Algo 8028 SIP Doorphone, which shows the order of steps you should take and explains how the intercom interacts with the locking mechanism.
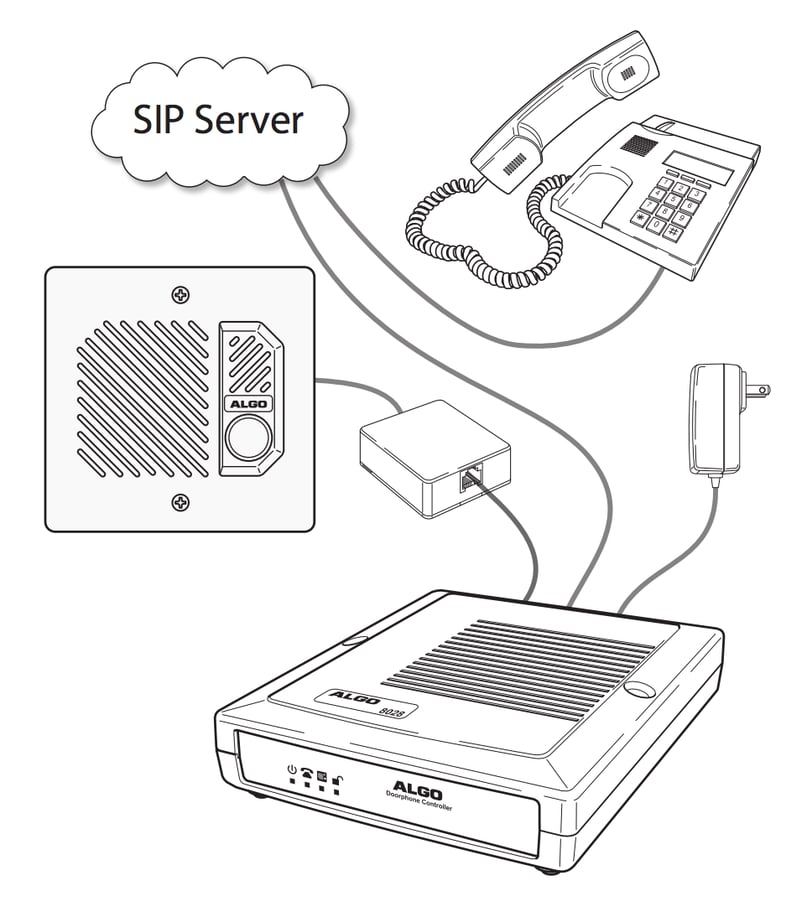
into an outlet and connecting it to the network via an Ethernet cable
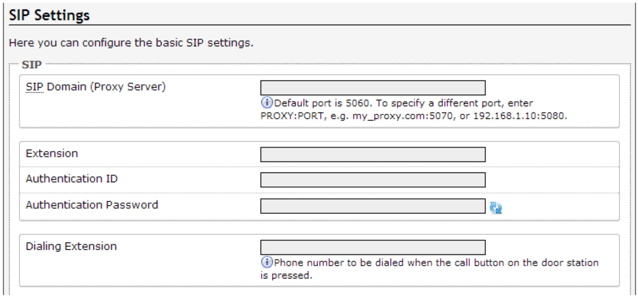
This documentation should also provide you with the information you need to enter the device's web interface. Within this interface, you'll find the device's software settings and defaults, including the volume of the intercom's speaker, the duration the door should be unlocked for, and which button on your phone you should press to unlock it — which is where OnSIP comes in.
Connecting Your Device to Your Phones
Within that web interface, you'll want to point it towards sip.onsip.com as its SIP Domain (Proxy Server). You'll then give the device a unique extension (similar to the ones given to your phones throughout the office) and a dialing extension. OnSIP customers typically choose a ring group as the dialing extension, so that multiple people can receive the request.
This information should be entered into the OnSIP Admin Portal as well - create a new user, and give it a descriptive name like "Door Buzzer". Give this user the extension you chose before (no need for a voicemail) and register it with OnSIP using the device credentials found within the web interface or on the device itself.
given to the device in its web interface (Algo 8028 interface above)
From the VoIP provider's perspective, the device just acts as an auto-dialing and auto-answering phone, where the speaker and microphone are treated like a typical phone receiver and microphone. It is the device's built-in software that interprets a certain button press as a request to unlock the door.
When the device is configured and registered through our Admin Portal, give it a test! Pressing the "Call" button on the intercom should ring the desired phones.