

Summary
| Overall: |   |
| Configuration: | |
| OnSIP Testing: | |
| Voice Quality: | |
| Ease of Use: | |
Note: The KX-UT136 has since been discontinued.
Having an instantly recognizable international brand sure doesn’t hurt when you’re planning on making a bigger dent in a crowded market. Consumer electronics giant Panasonic recently introduced a new line of corded desktop SIP phones for sale in the US. The name alone might make their offerings enticing to VoIP newbies - businesses that are understandably unfamiliar with SIP phone manufacturers that have been doing this for years.
The available models, the KX-UT136, KX-UT133, KX-UT123, and the KX-UT113 are part of Panasonic’s new line of ‘phones for the hosted / open source market’.
This isn’t the first time Panasonic has set their eyes on SIP desk phone solutions. A few years back, the company tested out the small office/home office (SOHO) waters with their KX-TGP5x0 series of SIP DECT phone systems. These were essentially SIP phones that served as base stations for add-on DECT handsets.
The newly introduced line is comprised of models that are much more traditional desk phone. DECT functionality has been replaced with the business desk phone essentials: wideband audio, PoE, programmable keys, etc.
Today we're going to be reviewing the Panasonic KX-UT 136, the top-of-the-line model in the company's KX-UT series. This model supports up to 4 simultaneous SIP account registrations, and includes a 242 by 109 pixel monochrome LCD, 24 programmable feature/functionality keys.
Phone Configuration
The following will be a quick guide to manually setting up the Panasonic KX-UT136 with OnSIP. The steps shown here should also work (more or less) if you’re using another provider.
These instructions assume your phone has successfully booted and completed network configuration including obtaining valid IP addresses for itself, an IP gateway and DNS servers either via DCHP, manual or other means (refer to your phone's documentation) and that your phone is running with factory defaults.
You will need your SIP credentials. You can find them in your OnSIP admin page under ‘users’. The information you’re looking for should look a little something like this:
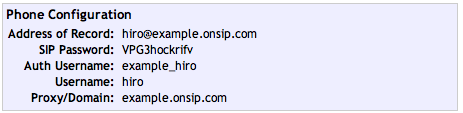
Hit the ‘Setting’ button on your phone. Hit down on the navigation square to scroll through the menu options and select ‘Information Display’. Here you will see your phone status. Hit the down arrow on your navigation square again until you see your phone’s IP address. Jot this down.
Return to the main settings menu and enter ‘Network Settings’. You should see an option here labeled ‘Embedded web’. Select ‘Embedded web’ and toggle it on. Your phone should make a beep when this happens. You can now access the web admin portal to register your phone. Type your phone’s IP address into your web browser. You will be asked for a login and password. The default values are ‘admin’ and ‘adminpass’. Note that you can and probably should change these values.
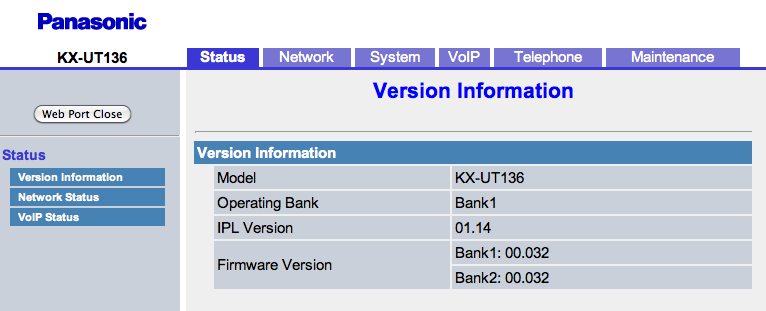
If all goes well, you should see an interface that looks something like this. Note that you can check your phone's version information, network status and VoIP status in the default view. For firmware upgrades, please refer to the manufacturer’s documentation.
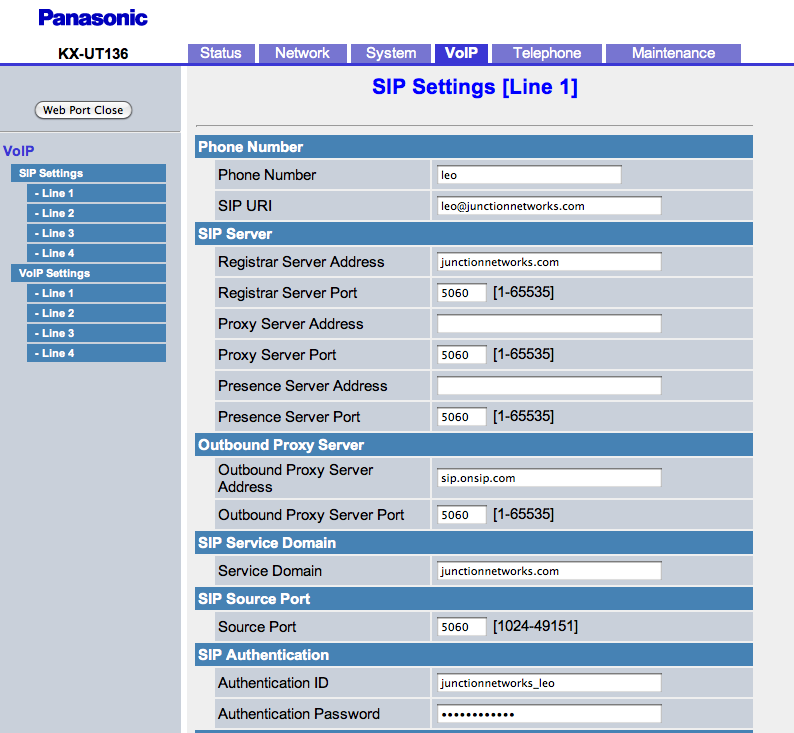
To set up your lines, select 'VoIP' from the top navigation menu. Click on Line 1 under ‘SIP settings’ in the displayed sidebar nav.
If you are trying to configure multiple users or multiple line appearances, you can simply repeat these steps for the other lines.
Enter in your User details as follows:
- Phone Number: Your Extension or Username
- SIP URI: Address of Record
- Registrar Server Address: Proxy/Domain
- Outbound Proxy Server Address: sip.onsip.com
- Server Domain: Proxy/Domain
- Authentication ID: Auth Username
- Authentication Password: SIP Password
- Ports: 5060
Hit save. It should look something like this:
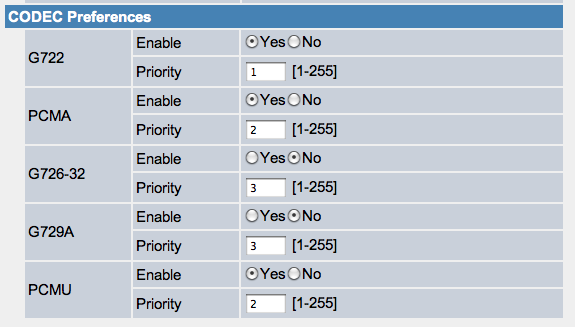
If you want to enable / disable codecs or prioritize them for your line, click line 1 under ‘VoIP settings’ in your side nav. Once again, repeat this step as necessary if you are setting up multiple lines.
Next, select ‘Telephone’ from the top navigation menu. You should see your different lines under ‘Call Control’ in your sidebar nav. Click on line 1 and you can change your line display name, set your voicemail box number, enter your dial plan, and configure your call forwarding rules.

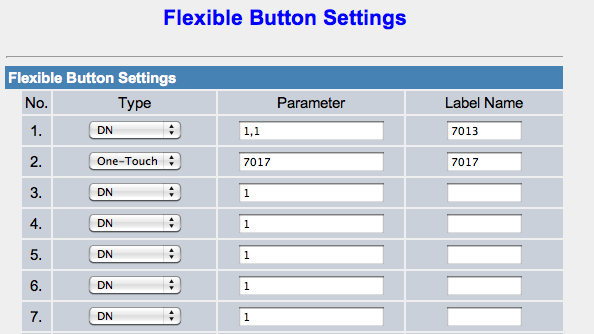
You should also see the ‘flexible button settings’ menu item in your sidebar nav. This allows you to configure your 24 programmable feature/functionality keys. There are several options here: one touch dial, BLF (given your provider supports this feature), etc.
Please consult your owner’s manual for further customization guidance. We did notice that changes made in the web admin portal are almost immediately pushed to the phone with no lag time or waiting.
JN Testing
At Junction Networks, we put each of the phones we use through a multi-step interoperability test in which we apply ~30 test cases. An example of a test case would be the following:
Test phone calls phone B
B picks up
B puts Test phone on hold
B calls phone C
C picks up
B transfers test phone to CCall must be transferred correctly to C. B must be released correctly after the transfer. When C picks up, audio must work in both ways between test phone and C. When test phone is on hold, there is no audio between it and phone B.
[ Firmware Version 00.032 ]
We found that the Panasonic KX-UT136 does not behave properly when it comes to receiving REFERs, which means that you will have difficulty trying to transfer callers who are using this phone.
This is problematic for a number of reasons. If you are an OnSIP customer, you probably have a public-facing company number that is linked to an auto-attendant. When callers reach the auto-attendant, they are given the option to dial numbers for departments, or dial your employees’ extensions.
Our auto attendant works by transferring incoming callers to the appropriate destination. Chances are that you won’t get anywhere if you’re calling in using the Panasonic KX-UT136. That’s a big problem.
The phone can send REFERs fine, which is why blind and attended transfers work without a hitch when it is the initiator. Try and transfer this phone during a call, however, and you’re likely to run into issues.
This isn’t really a violation of a SIP RFC, per se; it just doesn’t follow the SIP RFC that we use. We’ve spoken in detail about the issue with Panasonic and it seems like they will address this in the next firmware update, which should drop sometime in the fall.
Voice Quality
The Panasonic KX-UT136 supports wideband audio (G.722), which means that pure VoIP calls with other HD phones sound excellent. Remember that you will only get HD quality audio when the call does not traverse the public switched telephone network (PSTN). For OnSIP customers, this means extension-to-extension calls, calls to or from other SIP phones on the Internet, and conferencing.
We did experience a fair bit of white noise when we switched from the handset to the speakerphone. While it is by no means unusable, the speakerphone on the KX-UT136 is a far cry from the Polycom speakerphones we've grown accustomed to.
Ease of Use
We like the overall look and feel of the Panasonic KX-UT136. The phone features a nice large backlit LCD, large dialpad buttons that are satisfying to use, and clearly labeled hard keys for most of the call handling options you use day to day.
The 24 feature / functionality keys (with LED indicators) and the old school paper labeling insert acts as a built-in expansion module. As mentioned earlier, these keys can be programmed in the web interface. You will also need to rely on these keys to display your line statuses so be sure to plan your labels accordingly. To be honest, I could probably do without this section of the phone altogether. Maybe I'm biased from using a Polycom as my main desk phone, but wouldn't displaying lines on the LCD screen and having ‘soft keys’ to go between them be a more elegant way of handling line statuses? I also have no use for BLF on my phone because I typically rely on a web browser application to tell me my coworkers’ phone presence information. But that’s just my personal preference and it largely reflects the way I work. Another user might find the built-in expansion module incredibly useful.
The LCD screen is large enough that it’s not a chore to navigate through your menu lists; up to 5 menu options fit on the screen at once. Oddly enough, if you’re looking through your calls logs – a use case that calls for an easy-to-view list of information - the screen will only display one call at a time.
The navigation square hard keys make going through your phone menus easy and intuitive. The KX-UT136 also features 4 soft keys that sit directly underneath the LCD. These serve as either navigational aids or shortcuts.
There isn’t a whole lot here that you haven’t seen elsewhere if you’re familiar with VoIP phones at all, but I would like to talk very briefly about the way the Panasonic KX-UT136 handles transfer since this is oftentimes the most confusing feature to use. During a call you have the option to conduct a blind transfer, the option to transfer the person on the other end to a third party without initiating a call to the intended destination. This is presented to you as a soft key option. Simply hit the blind transfer soft key during a call, dial in the third party you'd like to transfer the call to, and hit 'Enter'. You also have a transfer hard key button that creates an attended transfer. Hit this button, and you’ll put your current caller on hold to initiate a new call with the third party. You can then give the third party fair warning before you press the ‘Okay’ button to transfer the call to them.
Have you tried any of Panasonic's new VoIP phones? If so, we'd love to hear what you think about these new entries.