Summary
| Overall: |      |
| Configuration: |      |
| OnSIP Testing: |      |
| Voice Quality: |      |
| Ease of Use: |      |
Quick Specs
- Open Standards based
- Address book centered
- Voice and Video calling
- XMPP IM and Group IM
Pros
- Highly customizable UI
- SIP (voice) and XMPP (IM) in one application
- Excellent audio quality with headset
Cons
- Awkward attended/consultative transfer
The following review was conducted in January 2011, and information on subsequent software updates and new version releases may not be reflected within. This review predates OnSIP’s desktop app, free to OnSIP users, so is not affected by bias.
A more recent review of this phone can be found here: Bria for Mac (version 4.0).
We tested video calling with the initial release of Bria (v3) and experienced some pretty severe frame rate and video-quality issues. Counterpath has since upgraded the softphone to version 3.1. The video call-quality issues have been resolved.
First Impressions
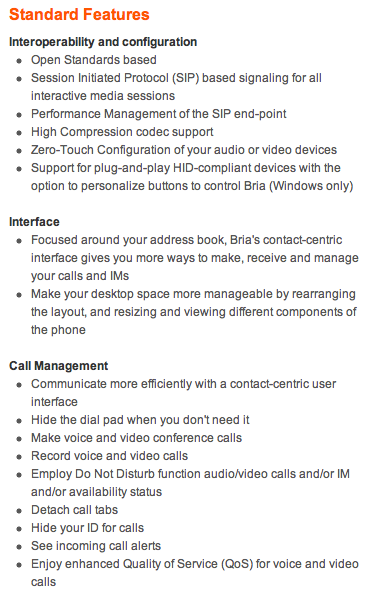
Bria 3.1 is Counterpath’s next-generation software phone application and successor to the much older Eyebeam. The main difference between the two is the user interface design philosophy. The Eyebeam is “dialpad-centric,” while Bria is “contact-centric”. The interface is focused around your address book, which Counterpath claims will give you “more ways to make, receive, and manage your calls and IMs“. Bria offers video conferencing in H.263 and H.264 video formats, wideband G.722 support for high-definition call quality, XMPP account support, support for multiple SIP accounts, and much more.

 |
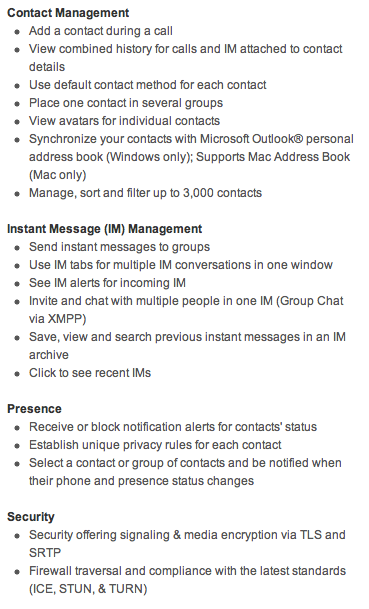 |
[ Above feature descriptions were taken from Counterpath website. ]
Phone Configuration
You’ll first need your user credentials: SIP address, SIP password, Auth Username, Username, Proxy/Domain. This information can be found in the user detail pages under the users tab in your admin portal:

If you’re using a Mac, choose Bria > Preferences > Accounts. If you’re on a Windows machine, choose Softphone > Account Settings from the Bria menu.
Enter in your user credentials in the Account screen that appears. “Account name” can be whatever you want it to be.
User Details
- User ID > Username
- Domain > Domain
- Password > SIP password
- Display Name > Whatever you would like
- Authorization user name > Auth username
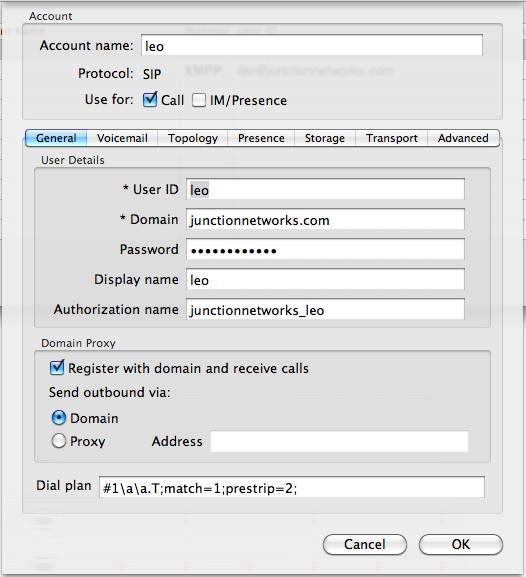
Check the option “Register with domain and receive calls.” Select the option “Proxy” under “Send outbound via:” and type in “sip.onsip.com.”
Since we handle all NAT-related issues, turn off any NAT settings on the phone to ensure that you can communicate properly with our servers. Under the Topology tab, select the option “None (use my local IP address).”
Click “Okay.”
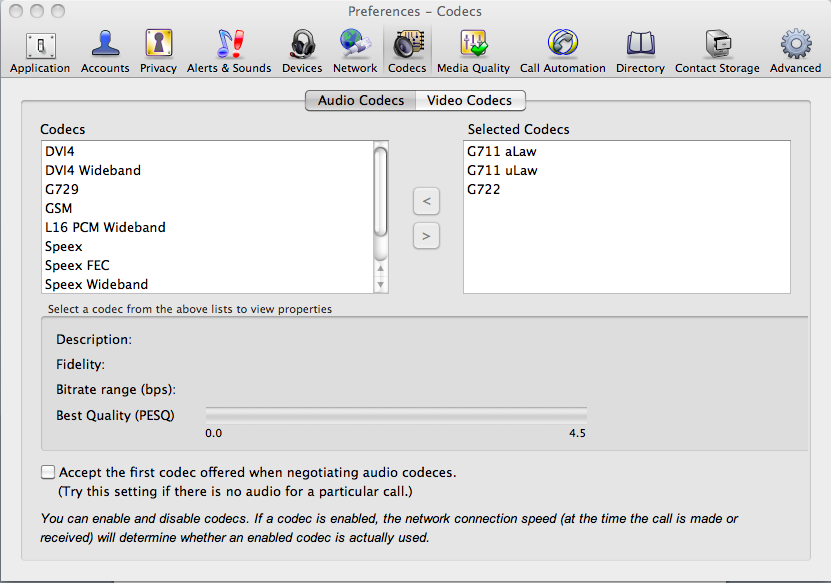
Next you will need to configure your audio and video codecs. Select the “Codecs” option in the “Preferences” menu. In “Audio Codecs,” move G.711 and G.722 to the “Selected Codecs” box if you are an OnSIP customer. Select the “Video Codecs” option and you can choose which video codecs you want to enable. Notice that clicking on the codecs will display a measurement of the quality and CPU usage associated with each one.
XMPP Account: Configuring Chat and Presence
From the Accounts tab, choose the "+" (plus sign) at the bottom to add a new account. Choose “New XMPP Account.”
User Details
- User ID > Username
- Domain > Domain
- Password > My.OnSIP password
- Display Name > Whatever you would like
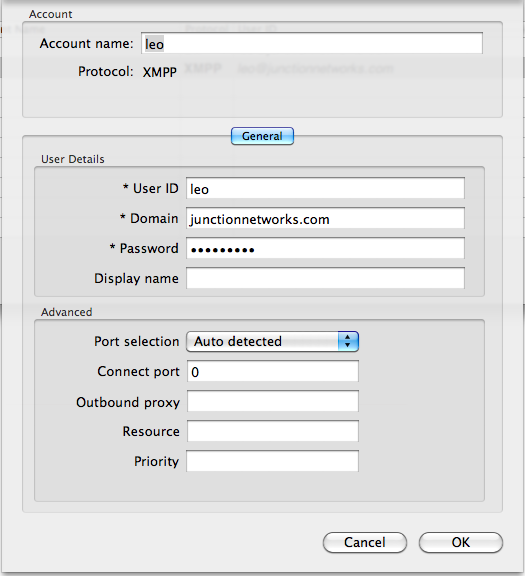
Click “Okay.”
The following video walks you through Bria setup on a Windows machine.
Compatibility Testing
At Junction Networks, we put each of the phones we use through a multi-step interoperability test in which we apply ~30 test cases. An example of a test case would be the following:
Test phone calls phone B
B picks up
B puts test phone on hold
B calls phone C
C picks up
B transfers test phone to C
The call must be transferred correctly to C. B must be released correctly after the transfer. When C picks up, audio must work both ways between test phone and C. When the test phone is on hold, there is no audio between it and phone B.
Not surprisingly, Bria 3.1 build 58312 passed our test cases with no issues.
Voice Quality
For optimal voice quality, we highly suggest investing in a USB headset. Bria offers many voice codecs that we were unable to test with our OnSIP service, including Speex, Speex wideband, DVI4, G729, iLBC, and more.
G711 sounds good with a headset—noticeably better than the call quality you get on regular phone calls. G722 sounds fantastic on the headset, like the person you’re on the call with is sitting right next to you. Keep in mind that your network connection speed will affect your call quality and even the codec that is used when a call is made/received. Bria supposedly factors in your network strength to select the codec that will provide you with the best overall experience.
Video Calling
Users have three video codecs to choose from: H.263, H.263+, and H.264. Keep in mind that video performance will vary depending on your computer’s ability to handle video calls, your network strength (even more than voice calls), and the codec you select.
For the most part, Bria to Bria and Bria to Eyebeam video call sessions worked great for us on our 1- to 2-year-old Macbook Pros. The video resolution was perfectly acceptable, and we did not experience many noticeable dips in frame rate, which is good.
We did run into problems getting Bria video to work with SIP communicator, another VoIP softphone. The caller on the other end would appear to us as nothing more than an inextricable green mess of video data even though both software phones support H.264.
Multiparty Video Conferencing
By turning your video calls into a conference call, you can invite more participants for a multiparty video conferencing session. The quality of these sessions is not as good as a one-on-one video call (the videos of the people in the conference call are shrunk considerably), but we found it very useable. This is a very neat feature to have, but there is certainly room for improvement. The Counterpath forums recommend that you limit multiparty video conferences to five participants total.
Ease of Use
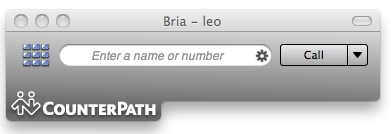
Bria has an incredibly customizable user interface. You can reduce it down to a single field for dialing SIP addresses, numbers, and extensions or insert sections like toolbar, dialpad, contacts, favorites, and history. Below on the left is what the UI looks like completely stripped down, and below on the right is what it looks like with everything displayed.
|
|
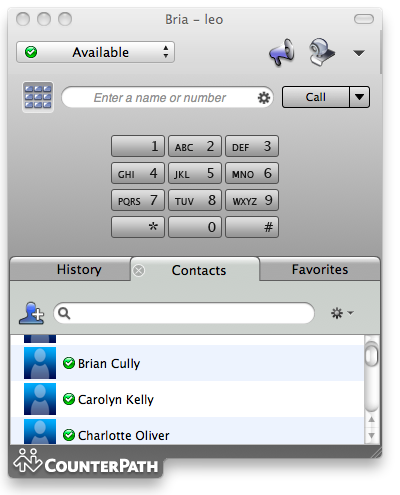 |
Let's start from the top of the UI with everything shown and work our way down. At the very top is the Bria toolbar, which includes a scroll-down menu for setting your XMPP presence state, the speakerphone and video toggle buttons, and a separate menu that includes a couple of other options: “hide my number,” “auto answer,” “letters to numbers,” and “call using my deskphone,” which was grayed out for us.
Below the toolbar is your dialer. You can either type in the number or SIP address you want to call in the field provided or choose to display and use the dialpad. Clicking on the small cog in the dialing field displays a dropdown menu including a list of the most recently dialed numbers. Selecting any of these numbers will automatically redial it for you. You’ll also notice that there is another dropdown menu next to the dialing field. This allows you to choose the type of call you want to initiate. You can choose between an audio call, a video call, or a conference call.
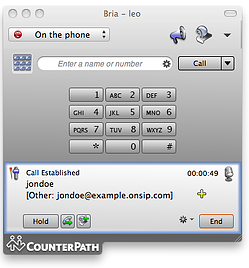
Below the dialer is where your call handling options appear when you’re in a call. At the very top left of this section is your volume control. The top right shows you how long the call has been going on. Next to the timestamp is an image of a mic that you can click on/off to toggle mute. Right below the mic you may see a yellow addition sign. You will see this if the person you’re calling is not already a contact. Clicking on this addition sign will open up a separate menu that allows you to add and configure the contact details of the person you’re on the call with. At the bottom left part of the section you’ll find your hold button, your transfer button (which will put the call on hold and display a new field that allows you to designate a transfer destination), and a “start my video” button that lets you turn a voice call into a video call. At the bottom right of this section is a cog that opens up another small dropdown menu. Here you can choose to turn the call into a conference call,and record the call.
It’s interesting to note that the Bria doesn’t really do an attended transfer the way we’ve come to know them. Let’s say you have two simultaneous calls going. Normally what happens during an attended transfer is that you transfer one caller to the other and hang up on both calls on your end. Bria doesn’t let you do this.
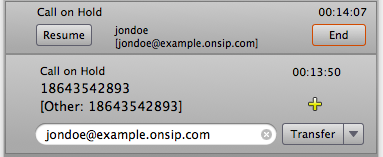
There is no “transfer to other caller” option when there is more than one call going. Instead, you treat the situation like a blind transfer. Here’s how it would look:
You’re on two calls, one with Jon Doe and one with a cell phone on the PSTN. You want to transfer the cell phone to Jon Doe. You hit the transfer button on your call with the cell phone, input Jon Doe’s SIP address in the transfer destination field, and hit send. Your call with the cell phone on the PSTN ends and Jon Doe gets an incoming call from the cell phone, but your call with Jon Doe is still ongoing. We’re not sure if this is the intended behavior.
Lastly, at the bottom of the UI you’ll notice three tabs: history, contacts, and favorites. Each of these three tabs includes a search field that allows you to do a quick lookup for a particular contact or call. Call history includes all your dialed, received, and missed calls. Clicking on a list item in your call history opens up a small contact card with more call information and the option to call that person again.
“Contacts” is where you manage your phone contacts and XMPP account. You’ll notice that Bria also includes XMPP presence information and will give you notifications when someone signs on/off if you add them to your alert list. Bria also gives you the option to display avatars for each contact. Clicking on your XMPP contacts will allow you to send them instant messages. The instant message feature of Bria works a lot like any other XMPP chat client you’ve used.
The last tab is “Favorites.” You can add people to this tab from your contacts tab. From the favorites tab, you can easily start an IM conversation or create a call with a “favorite” contact by clicking on the available options next to their name.


